Getting started with AutoPilot (WIN 10)
Automatic setup of a new PC (DaaS with AutoPilot), Windows 10
Screenshot may differ from actual display, and appear in a different language.
Start-up: Connect to network, basic selection, login and awaiting completion of the installation
You just need to start the PC, connect it to the network, sign in with your Azure AD credentials and wait while the machine completes its provisioning and the machine is ready to use.
Before proceeding, ensure that the following prerequisites are met:
Make sure you have an internet connection available, either wired or wireless.
Turn on the device. It will start a boot process that takes a few minutes, the machine will probably restart once. Furthermore, a number of basic choices follow, where you enter the following step by step:
- Network connection: You may not see this screen when connected to wired network. You can connect to either an office network or a home network. If you are not connected to a wired network, the process will ask you to connect your PC to an available wireless network. Select your wireless network and enter the wifi password and click Continue
- Regional settings: If prompted, select region (country)
- Keyboard layout: If prompted about keyboard layout, select e.g. Norwegian (Bokmål)
- Additional keyboard layout: Optional, if you don't see this choice it is pre-selected for you in your profile.
- License Agreement: If prompted, confirm the license agreement.
The next step is to sign in with your Azure Active Directory user credentials:

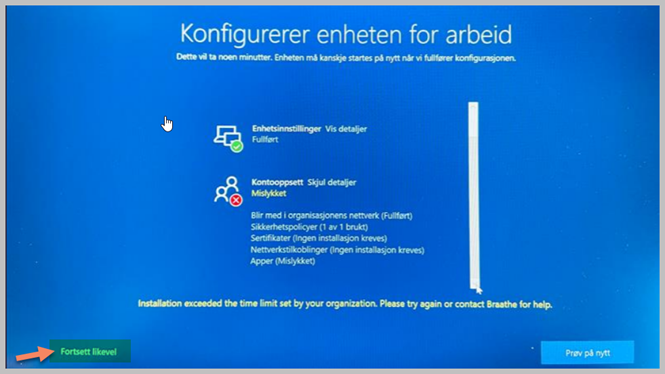
After logging in, you will see that the device begins final configuration. This takes approximately 20-60 minutes, depending on your network speed (you don't need to do anything here, just let the machine work on its own).

There are three main steps in this phase:
- Step 1 – Unit Preparation
- Securing your hardware
- Join the organization's network
- Registration of the device for mobile (Intune) administration
- Preparing your device for mobile (Intune) management
- Step 2 – Device Setup
- Configures the Windows 11 device.
- Step 3 – Account Setup
- Setting up your account.
- Installs necessary user-based applications.

Once the device setup is complete, you will be taken to the Windows Hello screen, as shown below.
If something here shows as "Failed", please press "Continue anyway". In the vast majority of cases, even with a message about a failed setup, you can use the machine as normal after the installation is complete. You must, however, submit a ticket to support@braathe.no, explaining that your installation process showed a failed message, so we may investigate and find the root cause.

Finally, you will be asked to configure Windows Hello, as shown below.
Click OK to use Windows Hello with your account.

Enter the code from the MS Authenticator app as received in an SMS.


